How Our Online Interior Design Process Works
What to Send and What Happens Next
Online design works well when the initial information is clear. This page explains what to send, how to take measurements, how we organize the project and what happens at each stage.
Step 1 — Send us your project information
In your first message, please send the project information listed below. This will help us review the space, confirm the required scope of work and provide an estimated price and timeline.
Please send us the following information:
-
A completed Interior Design Questionnaire (DOCX). Download the Interior Design Questionnaire (DOCX)
-
Floor plans and elevations (in case they are not available, prepare a simple hand-drawn sketch with the key dimensions)
-
Photos of each room (8–10 photos covering every wall, corner and important architectural feature)
-
If you have found any reference images or design ideas online, please send them as well.
-
Your design preferences, functional requirements, approximate budget and preferred design package.
For each online design project, we can create a personal Miro board where we collect plans, references, 3D views, comments, revisions, material notes and useful links. This helps keep all project information in one place and makes the remote design process clear and easy to follow.
Step 2 — Review the First Preliminary Result
Once we have received all the necessary project information, we prepare the first preliminary design result before requesting an advance payment.
For an interior design project, this may include functional zoning or furniture layout options. Depending on the room and project requirements, we may prepare up to three options. In some cases, the space has only one practical layout solution.
For a standalone 3D visualization project, we prepare the first draft rendering based on the materials and instructions provided.
This allows you to review our approach and see the first tangible result before making an advance payment. We then confirm the project cost and estimated timeline. If you decide to continue, you pay a 50% advance payment.
Step 3 — Develop the Design
After the advance payment, we continue developing the selected layout, concept or draft rendering.
Depending on the selected service, this stage may include concept boards, furniture and material selections, detailed 3D modeling, lighting design, technical drawings, additional views or other agreed deliverables.
Working materials can be presented on your personal Miro board, where you can review the project and leave comments.
Step 4 — Review and Revisions
We review your comments and make the agreed revisions.
During this stage, we refine the layout, furniture, materials, colors, lighting, drawings and 3D visualizations, depending on the selected package and your feedback.
The number of included revision rounds and their scope are confirmed in the project proposal before work continues.
Step 5 — Final Approval and Payment
After all agreed revisions have been completed, we send you the final version of the project for approval.
Once you approve the result, you pay the remaining 50% of the project cost.
Step 6 — Delivery of the Final Project Package
After the final payment, we prepare and send the complete project package in digital format.
Unlike the working materials used during the revision stage, the final package includes properly formatted drawings, final high-resolution renderings and other agreed deliverables.
Depending on the selected package, the final project album may include furniture layouts, technical drawings, high-resolution 3D renderings, material specifications, quantity estimates, shopping lists and product links.
Payment Methods
You can pay for our services via Western Union, MoneyGram, Xoom, RIA or SWIFT bank transfer.
For business clients in the United States, a domestic U.S. payment option through Bank of America may also be available. Please contact us to confirm the most suitable payment method.
How to Measure a Room for Online Interior Design in About 16 Minutes
1. Why Accurate Room Measurements Matter
Accurate room measurements help us:
-
Check the room geometry, including non-square corners, uneven walls and floor level differences. Room corners are not always exactly 90 degrees, walls may not be perfectly vertical, and floors may not be completely level. Without accurate measurements, built-in furniture may not fit properly, or uneven gaps may remain between the furniture and the walls.
-
Calculate the approximate quantities of materials required
-
Prepare a preliminary estimate of the scope of work
2. What You Need to Measure a Room
To measure a room, you will need:
-
a tape measure or laser distance meter;
-
three sheets of A4 paper or graph paper;
-
a pencil or pen.
-
an assistant is optional, but having another person can make the measuring process easier.
3. Quick Room Measurement Method — About 16 Minutes
This method is suitable for the following situations.
-
When minor measurement deviations are acceptable.
-
For an approximate check of the scope of work completed by contractors.
-
For estimating, purchasing and checking material quantities.
-
For basic cosmetic renovations.
-
If you absolutely have no time and you fully trust the repair team, but the monitoring of money spent is needed, spend just 16 minutes for measurements of the room and everything will be okay.
Follow these steps to prepare a preliminary room measurement plan.
Step 1 — Sketch the Room
On the first sheet, draw an approximate floor plan of the room. Walk around the perimeter and sketch its general shape, including projections, recesses and changes in the wall line. Try to preserve the overall proportions. Mark the wall containing the window or balcony door, and number the walls 1, 2, 3 and 4 clockwise from the room entrance.
On the second sheet, draw the elevations of Walls 1, 3 and 4 if they have a simple rectangular shape. Several simple wall elevations can be placed on the same sheet.
On the third sheet, draw Wall 2 separately. In my example, only Wall 2 has a more complex configuration, so it requires a separate sheet. In another room, several walls may require separate sheets, while all simple wall elevations may fit on a single sheet.
This initial sketch should take approximately five minutes. It does not need to be visually polished, but it should be clear and legible.
Step 2 — Record the Measurements
Measure horizontal dimensions approximately 1–1.5 m above the floor. Keep the tape measure level when measuring widths and vertical when measuring heights.
1. Measuring Wall 1, including the door opening. Record the overall wall width and height, the width and height of the door opening, the distance from the nearest wall corner to the opening, the door-frame or casing dimensions, and the dimensions of any baseboard sections.

2. Measuring Wall 2
-
overall wall width;
-
overall wall height;
-
the dimensions and positions of the window and balcony door openings;
-
window and door reveal depths;
-
the depth of the beam or lintel above the balcony door;
-
the length, projection (depth) and thickness of the windowsill;
-
all projections and recesses along the baseboard and their length;
-
the diameter and visible length of the heating pipes;
-
radiator or convector dimensions;
-
the distance from the radiator or convector to the floor and to the windowsill;
-
the height of the windowsill above the floor.
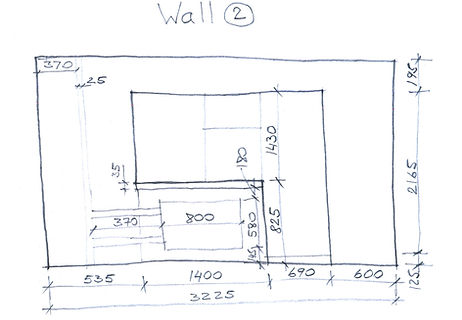
3. Measuring Walls 3 and 4. Follow the same measurement method. If either wall has a complex configuration, draw it on a separate sheet.

The room measurement plan is now complete. Using this quick method, you can prepare an approximate room measurement plan in about 16 minutes. It is suitable for preliminary online design, space planning and basic cosmetic renovations.
For major renovation work, construction, custom furniture, worktops, glass, built-in elements or other made-to-measure products, all dimensions must be verified on site by the contractor, installer or manufacturer before production or installation.